Showing posts with label Layout. Show all posts

Wednesday, December 15, 2010

Before-InProgress-After : Masterbedroom - Part 3

The full-height wardrobe

To design this, it took a lot of effort! Just the design alone, it has many revisions, at least 20 times!!

Because it was so customize, both ID and myself also forgotten about practicality. When the quote came, it for one 1 wardrobe. How the inside of the wardrobe looked like is up to me. So we started with a basic drawing and end up changing up to 15-20 times I think.

So came the day where I started to put my clothes and I realised..darn the wardrobe is too high. I cant get my clothes. I had to tip toe... I also realised, I needed more drawer space. Anyway I got those Ikea boxes too.

The final drawing after sooooooo many rounds


In Progress

3 panel sliding wardrobe.


First panel

Second and Third Panel

Things to take note:
1) The quoted price for the wardrobe is "designer's" price. Not factory or retail type. So my expectation were..since the price were higher..then
a) quality should be good.
b) the wardrobe, 1st handover, the clothes holder were like dropping because clothes too heavy n the rod seems to be causing a "u" shape. So the ID took it back and re-do it.
c) on 2 occasions, the ID took back the door to make the door more solids, the mirror to hold stronger n also change all colored mirror to the same color.
d) on a few patches, the workmanship was very bad. Although I can accept it, but ID insist to take back.
e) if you are doing your own design, better ask urself or take measuring tape n go to the actual site . Because on paper, it looks small, but real..its huge. That why I had to tip toe to get my stuff.

Tuesday, October 12, 2010

Before-InProgress-After : Master Bedroom Bath


This is the makeover for the Master Bedroom Bathroom.

Before:


1) can you see the extreme right hand side? Its light blue fan-fold door
2) The loo, wash basin, plastic shower screen, glass sticker, tiles were all removed

Click here for the ID's drawing.

In Progress:


1) Hacking everything off
2) Repositioning of the WC (some plumbing work)

After

Entrance to the new makeover bathroom/toilet

1) Change to 2 fold vanity door


Hope you like my selection of tiles from Guocera
2. Sorry for the messy top. Its still messy. I guess I am just "normal" right..
3. Re-do / add some lights and power points
4. Of course, new wash basin, tap, wc, water heater


1) utilised the entire wall and made it a mirror and one part of it storage
2) Instead of plastic shower screen, used glass to have the "hotel" look


1) Played with different "earth-tone" tile colors
2) Be a little environmental friendly by choosing WC with half and full flush

Issued face:
1) This is a positive problem. The water pressure in this condo is SUPER STRONG! So my water heater cannot heat up the water cos the pressure. I'm the type who love strong pressure hot water showers!!! So I've not found a solution yet. If I want really hot water, all I need to do is to switch off the pump. By doing so, I have slow water with hot water. If I want strong water, its cold/luke warm.

2) The 2nd problem is the wash basin tap. Similar to Bathroom2, we bought the wrong size. So everytime I put my head down, I will hit the tap.


BTW, I apologise as I am not a professional photographer and I just snap the photos as it is. Very sorry for the messiness, like not clearing the counter top, putting down the toilet seat, closing the shower screen, etc In fact, I love this toilet! Just compare the BEFORE and now...hehehehe

Thanks for reading

Thursday, September 9, 2010

Before-InProgress-After : Room 2

Before:


 It was a girl's room. 
So pink, so nice. 
Wished I was little again. 
I never had my own room until I came back from university

This room had no fan. So I bought a KDK from Top 10 in Puchong
*Must Visit this shop if you intent to buy FANS, Panasonic, KDK or Alpha as they are super cheap* Even staff price cannot get this cheap. I compared as Harvey Norman Staff Price cannot get me this rate. The sales guy said they only earn RM2 per fan sold. How True I dont know, but surely they have volume. When I went, they were PACKED.

Location: Top 10, just 2 doors away from Tesco Puchong. Same side.

Air-con, the previous owner left it there. However the ID re-located the air-con hose. Air-con hose used to end up at MasterBedroom toilet. But since I wanted a dry toilet area, (where the air-con hose were), no choice but to relocated the air-con hose to 2nd toilet wet area.
 
In Progress


They put in the Ikea Wardrobe originall from the Master Bed Room
The shelves were custom made and measured.
The curtain rod was removed and thrown away

Grills needed as Philip is still young.

Grill and Shelves Prices were mentioned earlier. Please scroll to old post.

Electrical: Added some florencent tubes and fan.
Since this is NOT considered a big makeover, no point to contact the plaster ceiling guy. So the ID innovative-ly used wood cover up the ceiling.


After

This is the Maxtrack Blind which I talked about. The left hand side is closed up with 10% sunlight.
The right hand side, in between the "lines" will be direct sunlight.

This is good as I dont have to turn on the lights for Philip to sleep at night. Natural lights. So he can get used to sleeping without lights.

Location: Maxtrack is located in Jaya 1
Price: RM30 per sq ft with 25% further discount off the total bill


Please click on the photo to see the entire picture.

Location:
1) Jundeco: Ikano. http://jundeco.com.my/. I got mine physically as I wanted to see it before purchase
2) Korean Mat: Mini Toons, 1U.
3) Thomas and Cars Duvet from Flea Market, Subang Parade.

The wood ceiling


So do I like this room?
The occupant of this room is super pleased. :D


Thursday, July 15, 2010

Design & Layout - Part 3/3

Soon, Eunice produced the 3D visuals for me. It took her less than 1 week. I had no issues on the waiting time.

My jaw dropped when she email-ed over. I even had to print it on color laser a3 size to see it on hard copy ;p

This is what I got. Enjoy


Master Bedroom
The bed (King size), I will buy separately
TV Console, to be built
Sliding door wardrobe, to be built
Bedside table, to be built
Fan, to be purchased
Aircon, existing
Plaster ceiling, existing
Additional lights to be added
Instead of curtain, I used blinds
TV, I limited to 32"


Master Bedroom Bath
100% makeover. Nothing from the old toilet used
New WC, new basin, tap, bath tub*, tiles, built in cabinets, etc


My son punya room
Curtains replaced with blinds
Beds- reused
Only thing new are: Carpentry works (shelves), the wardrobe is old one. New fan, fake plaster ceiling which was made by wood due to carpentry work. Added lighting. Add in stickers to make the room more boyish.
The reason why I didnt want a total makeover because, he is still young. If I spend $$ on it, later when he grows up and he dont like it how? Also, he is not toilet trained yet and if I buy another Nightingale (bed), and he urine...heartache. Furthermore, staying in a condo, very hard to sun-dry right.

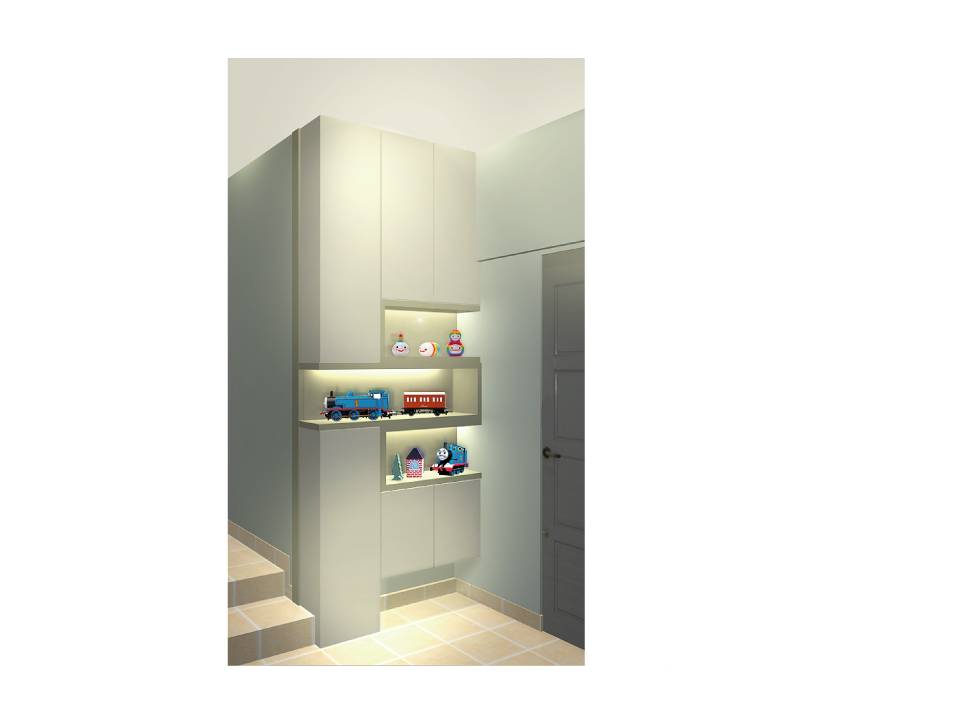
This is a corner at the hallway. Instead of just a wall, I requested for carpentry work and the width to go parallel with the steps. So there are some display and some storage.


This is the shoe cabinet. Didnt waste any space. So built right-up. Top portion can double up as storage. I also had a space to put umbrellas which cant be seen here. The lower shelf is for daily wear shoes/slippers (those that used often) and the seat, is for the elderly or to place things, ie: your groceries, etc

So what's next from here?

Monday, July 12, 2010

Design & Layout - Part 2

After agreeing to the layout as per Part 1, Eunice then asked me, what type or style do I like?
She gave me a few to choose. Generally, she is asking what's my taste or what do I want.

So mine were
- must feel comfortable. After a hard day's work, I want to come back to a comfortable place
- must feel bright / natural
- design cannot be too modern or out of the world
- when people step in to the house, he/she must feel welcome

She then email me with a few concepts such as 


Of course when she gave the 5 styles, you would go wow..everyone also LIKE. So how do we go about it? So  I will tell her a mixture of this and that. Very indecisive hor? But I guess we are all human and we all like things that are nice right ;-)


Thursday, July 8, 2010

Design & Layout - Part 1

First thing first, to pass the developer's layout plan to the ID.


From there, she came to my house (USJ) to snap some photos. To see my lifestyle and what items (furniture) to re-use.


Then she came out with the layout and furniture placement. She came out with 2 options. From there I have to shortlist 1 and make further comments/changes.

From the layout, on the right hand side are the current furniture from my USJ house....to reuse la. No point buying new. NO appreciation cost.

On the left, its her suggested placement.